Epoxy Resin Table Step by Step: A Comprehensive Guide to Crafting Your Own Stunning Table
Are you looking to add a touch of elegance and sophistication to your home decor? One way to achieve this is by crafting your own epoxy resin table. Epoxy resin tables are not only beautiful and unique, but they are also versatile and durable, making them an excellent addition to any space. In this comprehensive guide, we will walk you through the step-by-step process of creating your own stunning epoxy resin table.
Gathering Your Supplies
Epoxy Resin
The first step in creating your epoxy resin table is to gather all the necessary supplies. The most important item you will need is epoxy resin. Epoxy resin is a type of material that is commonly used in woodworking and crafting projects. It is durable, versatile, and easy to work with, making it the perfect choice for creating a stunning table.

Table Base
Next, you will need to select a table base for your epoxy resin table. You can choose from a variety of options, such as wood, metal, or even acrylic. Make sure to select a table base that is sturdy and compatible with epoxy resin.
Preparing Your Workspace
Clear Workspace
Before you begin the crafting process, it is essential to clear a workspace that is free from clutter and debris. This will ensure that you have enough room to work and that your project remains clean and organized throughout.
Protective Gear
It is also important to wear proper protective gear, such as gloves, goggles, and a mask, when working with epoxy resin. This will help protect you from any potential hazards and ensure your safety throughout the crafting process.
Read the Recent Articles of the Day by Clicking Here!
One important suggestion for creating an epoxy resin table is to thoroughly plan and prepare before starting the project. This includes selecting the right materials, having a clean and level work surface, and ensuring proper ventilation in your workspace.
Step 1: Choose a suitable table base – Select a table base that is sturdy and has a flat surface. This could be an old table that you want to refinish or a custom-built table frame.
Step 2: Prepare the tabletop – Sand down the tabletop to create a smooth and even surface for the epoxy resin to adhere to. Clean the surface thoroughly to remove any dust or debris.
Step 3: Create a barrier – Use painter’s tape or a silicone barrier to create a barrier around the edges of the table to prevent the epoxy resin from overflowing.
Step 4: Mix the epoxy resin – Follow the manufacturer’s instructions to mix the epoxy resin and hardener together. Make sure to mix thoroughly to avoid any air bubbles in the resin.
Step 5: Pour the epoxy resin – Carefully pour the mixed resin onto the tabletop, starting in the center and working your way out towards the edges. Use a spreader tool to evenly distribute the resin over the entire surface.
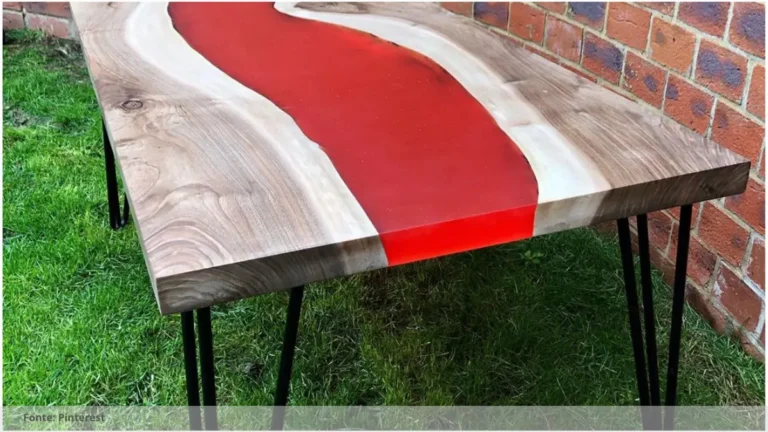
Step 6: Add color or additives (optional) – If desired, add color pigments, metallic powders, or other additives to create a unique design in the resin. Use a toothpick or a small stick to swirl the colors together for a marbled effect.
Step 7: Pop air bubbles – To remove any air bubbles that may have formed in the resin, use a heat gun or a torch to gently heat the surface of the tabletop. Be careful not to overheat the resin, as this can cause it to bubble or scorch.
Step 8: Let it cure – Allow the epoxy resin to cure and harden according to the manufacturer’s instructions. This may take anywhere from 24 to 72 hours, depending on the type of resin used.
Step 9: Remove the barrier – Once the epoxy resin has fully cured, carefully remove the painter’s tape or silicone barrier from around the edges of the table.
Step 10: Finish the table – Sand down any rough edges or uneven areas on the tabletop, and apply a clear coat or resin sealant to protect the surface and give it a glossy finish.
By following these steps and taking your time to properly plan and prepare, you can create a stunning epoxy resin table that will be a beautiful addition to your home. Enjoy the process and let your creativity shine through in your finished masterpiece.

Frequently Asked Questions: Epoxy resin table step by step
What materials do I need to make an epoxy resin table?
To make an epoxy resin table, you will need epoxy resin, hardener, a mixing container, a mold, a release agent, a heat gun or torch, and any desired coloring or embellishments.
Can I customize the design of my epoxy resin table?
Yes, you can customize the design of your epoxy resin table by choosing different colors, patterns, and additives such as glitter or metallic pigments to create a unique look.
How long does it take to complete a resin table?
The time it takes to complete a resin table can vary depending on the size, complexity, and required curing time of the resin. Typically, it can take several days to weeks.
Are there any safety precautions to take when working with epoxy?
Yes, when working with epoxy it is important to wear protective gloves, safety glasses, and a mask to prevent skin contact, eye irritation, and inhalation of harmful fumes.
So, what do you think about this subject? Share your opinion in the comments and let’s continue discussing together!