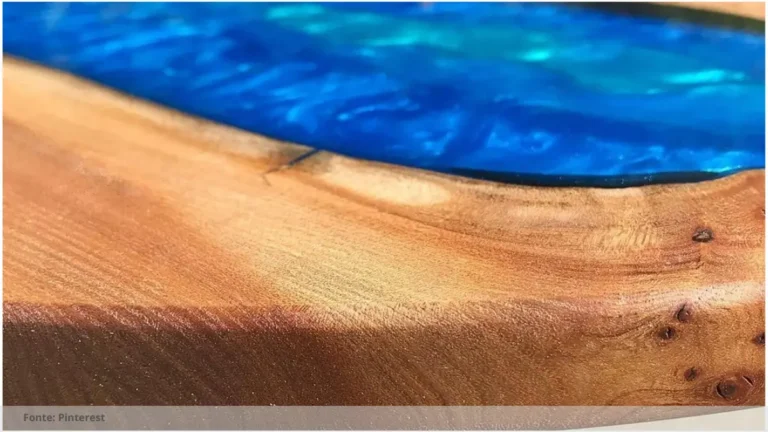
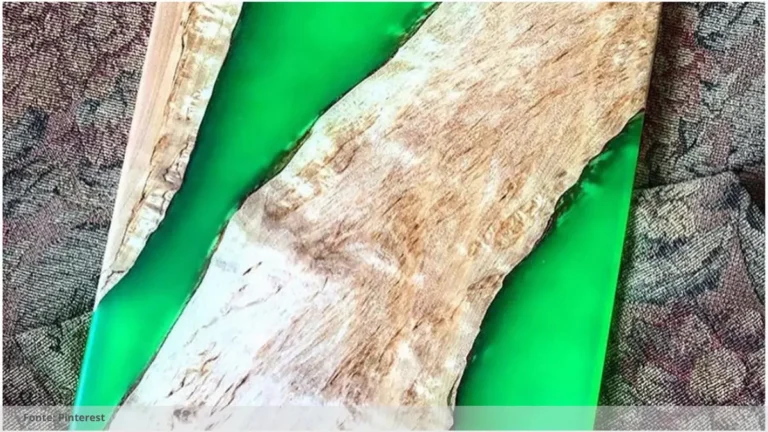
How to Epoxy Table Top Edges
Before you begin the epoxy table top edges sealing process, make sure you have all the necessary materials. This includes epoxy resin, hardener, mixing cups, stirring sticks, gloves, and a brush for application.
Prepare your workspace
Ensure you have a well-ventilated area to work in, as epoxy resin can emit strong fumes. Lay down a drop cloth or plastic sheeting to protect your work surface from any spills or drips.

How to epoxy table top edges
Start by mixing the epoxy resin and hardener according to the manufacturer’s instructions. Stir the mixture thoroughly to ensure a proper blend. Using a brush, apply a thin coat of epoxy along the edges of the table top, making sure to cover all exposed surfaces.
Allow the epoxy to cure
Once you have applied the epoxy, allow it to cure for the recommended amount of time. This usually takes anywhere from to hours, depending on the specific product you are using.
Tips for a Perfectly Sealed Surface
Avoid overworking the epoxy
When applying the epoxy, try to avoid overworking it. This can cause air bubbles to form, which can ruin the smooth finish of your table top edges. If you do notice any bubbles, you can use a heat gun or torch to gently pop them.
Sand in between coats
To achieve a perfectly sealed surface, it is recommended to sand in between coats of epoxy. This will help to remove any imperfections and ensure a smooth finish. Be sure to clean the surface thoroughly before applying each new coat.
By following these simple steps and tips, you can achieve a beautifully sealed table top edge that will be both durable and visually appealing.
Read the Recent Articles of the Day by Clicking Here!
When epoxying a table top, it is crucial to pay attention to the edges to ensure a perfectly sealed surface. Here is a step-by-step guide on how to epoxy table top edges:
1. Prepare the surface: Before starting the epoxying process, make sure the edges of the table top are clean and free of any dust or debris. Sand down any rough edges or imperfections for a smooth finish.
2. Mask off the edges: Use painter’s tape to mask off the edges of the table top to prevent any epoxy from dripping onto the sides of the table. This will help create a clean and professional-looking edge.
3. Mix the epoxy: Follow the manufacturer’s instructions to mix the epoxy resin and hardener together. Make sure to mix thoroughly to ensure a proper chemical reaction and a strong bond.
4. Apply the epoxy: Using a brush or small foam roller, carefully apply the epoxy to the edges of the table. Make sure to work quickly to avoid the epoxy drying before you are finished.
5. Spread the epoxy: Use a plastic spreader or disposable brush to spread the epoxy evenly along the edges, making sure to cover any bare spots or rough patches. Smooth out any drips or excess epoxy as you work.
6. Remove the tape: Once you have applied the epoxy to the edges, carefully remove the painter’s tape while the epoxy is still wet. This will prevent any drips from drying and creating a messy edge.
7. Let the epoxy cure: Allow the epoxy to cure according to the manufacturer’s instructions. This may take several hours or even days, depending on the type of epoxy used. Make sure the table top is placed in a well-ventilated area during the curing process.
8. Sand and finish: Once the epoxy has cured, carefully sand the edges of the table top with fine-grit sandpaper to smooth out any imperfections or rough spots. Finish with a coat of sealant or polish for a glossy and durable finish.
By following these steps and taking your time, you can achieve a perfectly sealed surface for your table top with epoxy edges. This will not only protect the edges from damage but also enhance the overall appearance of your table.

Frequently Asked Questions: How to epoxy table top edges
What materials are needed for epoxy table top edges?
The materials needed for epoxy table top edges include epoxy resin, hardener, wood or metal edge trim, mixing containers, stirring sticks, sandpaper, and a heat gun or torch.
How do I prepare the surface for epoxy application?
To prepare the surface for epoxy application, start by cleaning the surface thoroughly to remove any dirt or debris, then sand the surface to create a rough texture for better adhesion.
Can I use epoxy on different types of table edges?
Yes, epoxy can be used on various types of table edges, such as wood, metal, or plastic, to create a smooth and durable finish that enhances their appearance and durability.
How long does it take for epoxy to fully cure?
The curing time for epoxy can vary depending on the specific product used, but generally, it takes between 24 to 72 hours for epoxy to fully cure.
So, what do you think about this subject? Share your opinion in the comments and let’s continue discussing together!