How to Make Epoxy Wood Table
Choosing the Right Materials
When it comes to creating a beautiful epoxy wood table, the first step is to choose the right materials. Start by selecting a high-quality piece of wood that suits your style and preferences. Popular choices include oak, maple, and walnut, but the possibilities are endless. Make sure the wood is properly sanded and prepared for the epoxy application.
Mixing and Applying the Epoxy
Once you have your wood selected and prepared, it’s time to mix and apply the epoxy. Follow the manufacturer’s instructions carefully to ensure proper mixing ratios and curing times. Be sure to work in a well-ventilated area and wear protective gear to avoid exposure to fumes. Pour the mixed epoxy onto the wood surface, using a spreader to ensure even coverage.

How to Make Epoxy Wood Table
Creating a beautiful epoxy wood table is a rewarding and creative project that can elevate any space. By following these steps and techniques, you can achieve stunning results that will impress your friends and family.
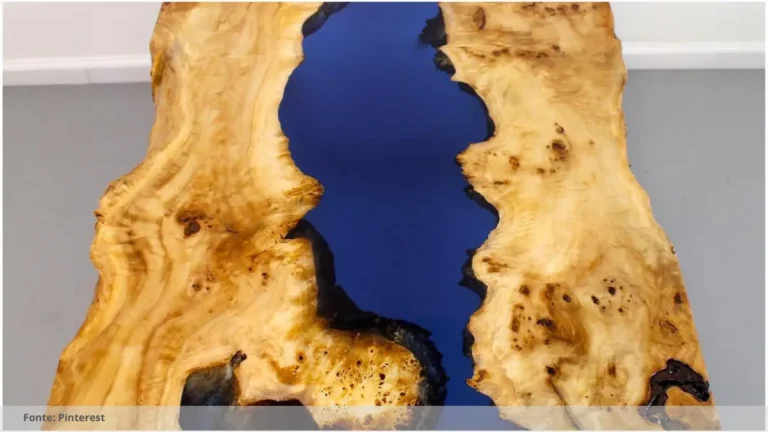
Adding Color and Design
One of the most exciting aspects of working with epoxy is the ability to add color and design elements to your table. Consider incorporating pigments, metallic powders, or even glitter for a unique and eye-catching look. Experiment with different techniques such as swirling, layering, or marbling to create a one-of-a-kind design.
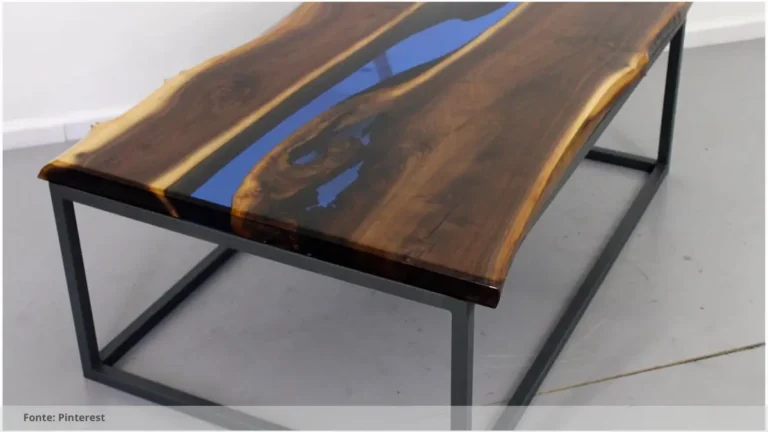
Finishing and Sealing
After the epoxy has cured and your design is complete, it’s time to finish and seal your table. Sand the surface to remove any imperfections and smooth out rough edges. Apply a clear coat of epoxy or a durable sealant to protect the wood and enhance the shine of the epoxy. Allow ample time for the sealant to dry before using your new table.
Enjoying Your Handmade Masterpiece
Once your epoxy wood table is complete, take a moment to admire your handiwork and enjoy the beauty of your handmade masterpiece. Whether you use it as a dining table, coffee table, or decorative accent piece, your stunning creation is sure to be a conversation starter and a focal point in your home. Experiment with different styles, techniques, and colors to create a truly unique and personalized piece that reflects your creativity and craftsmanship. With a little time, effort, and creativity, you can transform a simple piece of wood into a beautiful work of art that will be cherished for years to come.
Read the Recent Articles of the Day by Clicking Here!
1. Choose the right wood: Select a high-quality, solid wood for your table that has a smooth surface and minimal imperfections. Popular choices include oak, walnut, cherry, or maple.
2. Prepare the wood: Sand the wood surface thoroughly to remove any rough spots or finish. Make sure the surface is clean and free of dust before applying the epoxy.
3. Create a barrier: Use painter’s tape to create a barrier around the edges of the wood to prevent the epoxy from dripping onto the floor or other surfaces.
4. Mix the epoxy: Follow the manufacturer’s instructions to mix the epoxy resin and hardener together. Make sure to mix thoroughly to avoid any sticky spots or air bubbles.
5. Apply the epoxy: Pour the mixed epoxy onto the wood surface, using a brush or roller to spread it evenly. Use a heat gun or blowtorch to remove any air bubbles that may appear.
6. Add color or texture: If desired, you can add color pigments or special effects like metallic powders to the epoxy to create a unique look. Mix these in thoroughly before applying the epoxy to the wood.
7. Let it cure: Allow the epoxy to cure according to the manufacturer’s instructions. This typically takes 24-48 hours, depending on the brand and type of epoxy used.
8. Sand and finish: Once the epoxy is fully cured, sand the surface to remove any imperfections or rough spots. Apply a clear coat or finish to seal and protect the wood and epoxy surface.
By following these steps and taking your time to properly prepare and apply the epoxy, you can create a stunning wood table that will be a stunning centerpiece in your home.

Frequently Asked Questions: How to make epoxy wood table
What materials are needed to make an epoxy wood table?
To make an epoxy wood table, you will need wood for the tabletop, epoxy resin, hardener, disposable mixing cups, stirring sticks, sandpaper, and a blowtorch for removing bubbles.
Can anyone make an epoxy wood table regardless of skill level?
Yes, anyone can make an epoxy wood table regardless of skill level. There are many tutorials, kits, and resources available to help beginners create beautiful epoxy wood tables.
How long does it take to complete an epoxy wood table?
The time it takes to complete an epoxy wood table can vary depending on the size and complexity of the project. Typically, it can take anywhere from a few days to a few weeks.
Are there tips for achieving a stunning result with epoxy?
Some tips for achieving a stunning result with epoxy include properly preparing the surface, mixing the epoxy thoroughly, avoiding bubbles, and allowing sufficient curing time.
So, what do you think about this subject? Share your opinion in the comments and let’s continue discussing together!