Creating a River Table Mold
Choosing the Right Materials
When it comes to making a river table mold, it’s important to select the right materials. You’ll need a sturdy mold box, silicone sealant, a release agent, and of course, the mold material itself. Epoxy resin is a popular choice for river tables due to its durability and clarity.
Preparing Your Workspace
Before you begin the process of making your river table mold, make sure you have a clean and organized workspace. Lay down some protective covering to prevent any spills or drips from ruining your work surface.

How to Make River Table Mold
To start creating your river table mold, first, assemble your mold box and seal the corners with silicone sealant to prevent any leakage. Next, apply a release agent to the inside of the mold box to ensure easy removal once the mold is set.
Mix your epoxy resin according to the manufacturer’s instructions and pour it into the mold box. You can add color pigments or dyes to create a unique look for your river table.
Setting the Mold
Allow the resin to set and cure for the recommended time before attempting to remove the mold. This can take anywhere from 24-hours depending on the type of resin you are using. Once the resin has fully cured, carefully remove the mold box and admire your handiwork.
Finishing Touches
After removing the mold, you may need to do some light sanding or polishing to achieve the desired finish for your river table. You can also add additional layers of resin for added depth and dimension.
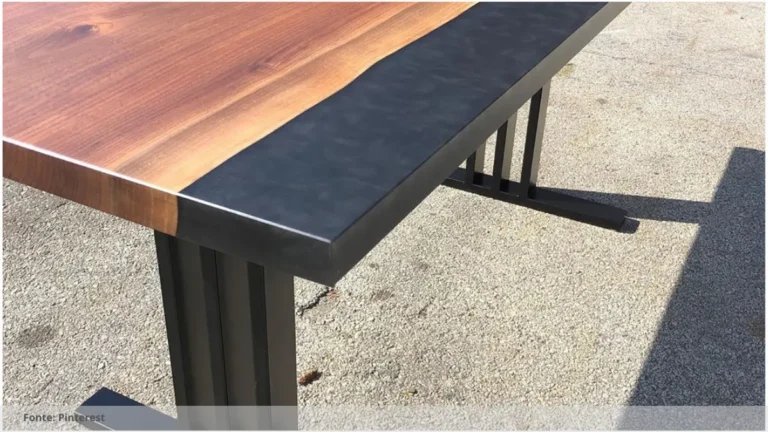
Enjoy Your New River Table
Congratulations, you’ve successfully created your own river table mold! Now all that’s left to do is assemble the rest of the table using wood or other materials of your choice. Your unique and eye-catching river table is sure to be a conversation piece in your home.
Read the Recent Articles of the Day by Clicking Here!
When making a river table mold, it’s important to follow a step-by-step guide to ensure the best results. Here are some key suggestions for DIY enthusiasts looking to create their own river table mold:
1. Start with a sturdy and level work surface: Before beginning the mold-making process, make sure you have a flat and stable surface to work on. This will help ensure your mold turns out straight and even.
2. Choose the right materials: Select a high-quality, flexible mold material that will be easy to work with and create a smooth finish on your river table. Popular options include silicone molds or melamine boards.
3. Measure and plan out your design: Take precise measurements of the river table you want to create and map out where the river will flow through the table. This will help you determine the size and shape of your mold.
4. Seal and prepare the mold surface: Before pouring any resin, it’s important to seal the mold surface to prevent leaks. Use a silicone sealant or mold release spray to ensure a clean release once the resin has cured.
5. Pour the resin carefully: Slowly pour the resin into the mold, making sure to fill in all the nooks and crannies of your design. Use a level to ensure the resin doesn’t pool or create uneven surfaces.
6. Remove air bubbles: Once the resin is poured, use a heat gun or torch to remove any air bubbles trapped in the resin. This will help create a clear and smooth finish on your river table.
7. Allow the resin to cure: Follow the manufacturer’s instructions for curing time and temperature. Be patient and allow the resin to fully cure before removing it from the mold.
8. Sand and finish: Once the resin has cured, carefully remove it from the mold and sand down any rough edges or imperfections. Apply a finishing coat to protect the surface and give your river table a polished look.
By following these suggestions and taking your time during each step of the process, DIY enthusiasts can create a stunning river table mold that will be a beautiful addition to any home.

Frequently Asked Questions: How to make river table mold
What materials do I need for a river table mold?
To create a river table mold, you will need materials such as melamine, silicone caulk, release agent, screws, and spacers. These supplies are essential for creating a successful mold.
Can I reuse the mold for multiple projects?
Yes, molds can be reused for multiple projects as long as they are properly cleaned and maintained after each use to ensure the quality of the final product.
How long does it take for the resin to set?
The time it takes for resin to set can vary depending on the specific product, but it typically ranges from 24 to 72 hours for a complete cure.
Do I need any special tools to make a river table?
Yes, to make a river table, you will need tools such as a table saw, router, sander, epoxy resin, clamps, and a level to achieve optimal results.
So, what do you think about this subject? Share your opinion in the comments and let’s continue discussing together!